

Add SVGs + Google Icons to Squarespace website
How to Add AN SVG Icon to Page
Step 1 — Upload the SVG file using the block editor
Go into any basic Text block
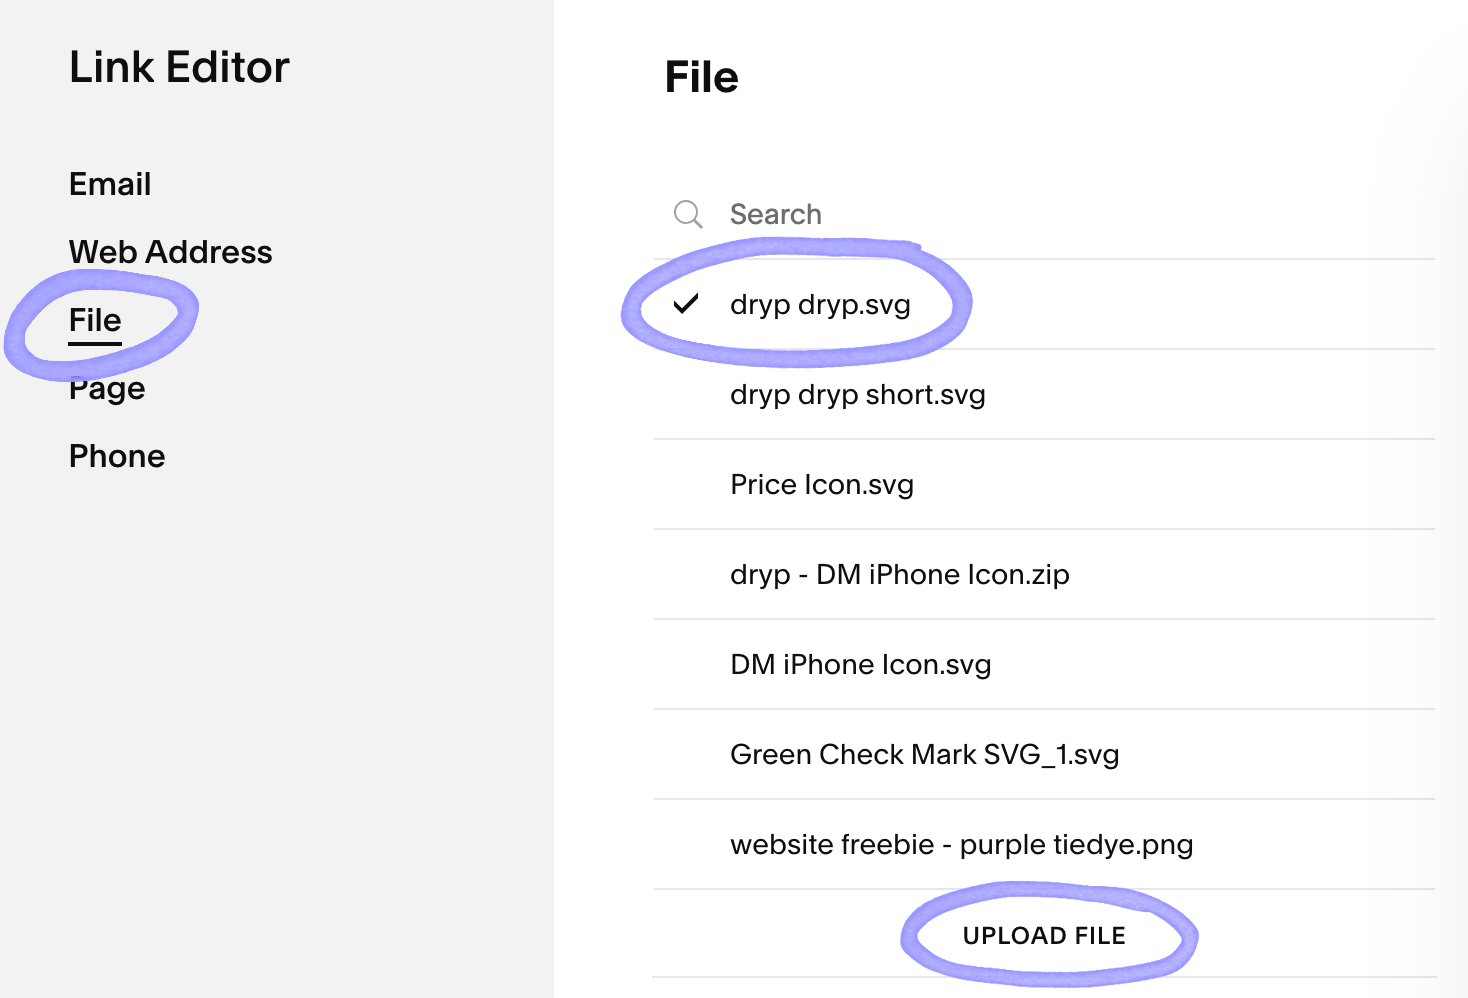
Click on the Link button
Click on the Gear button
Select the “File” option
Then “Upload File” with the SVG
Click on the file uploaded so there’s a Check Mark to the left of the file name
Click “Save”
Highlight and copy the uploaded file’s short link and place it into the embed code example
It will appear as: “ /s/dryp-dryp.svg ”
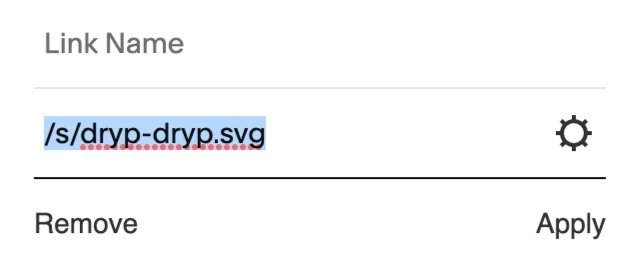
this is the link it will be used across the site when using this SVG
TIP: Save this url link to a brand manual, notes app, or organization folders for easy access and reference
Step 2 — Embed Your SVG Into a Page
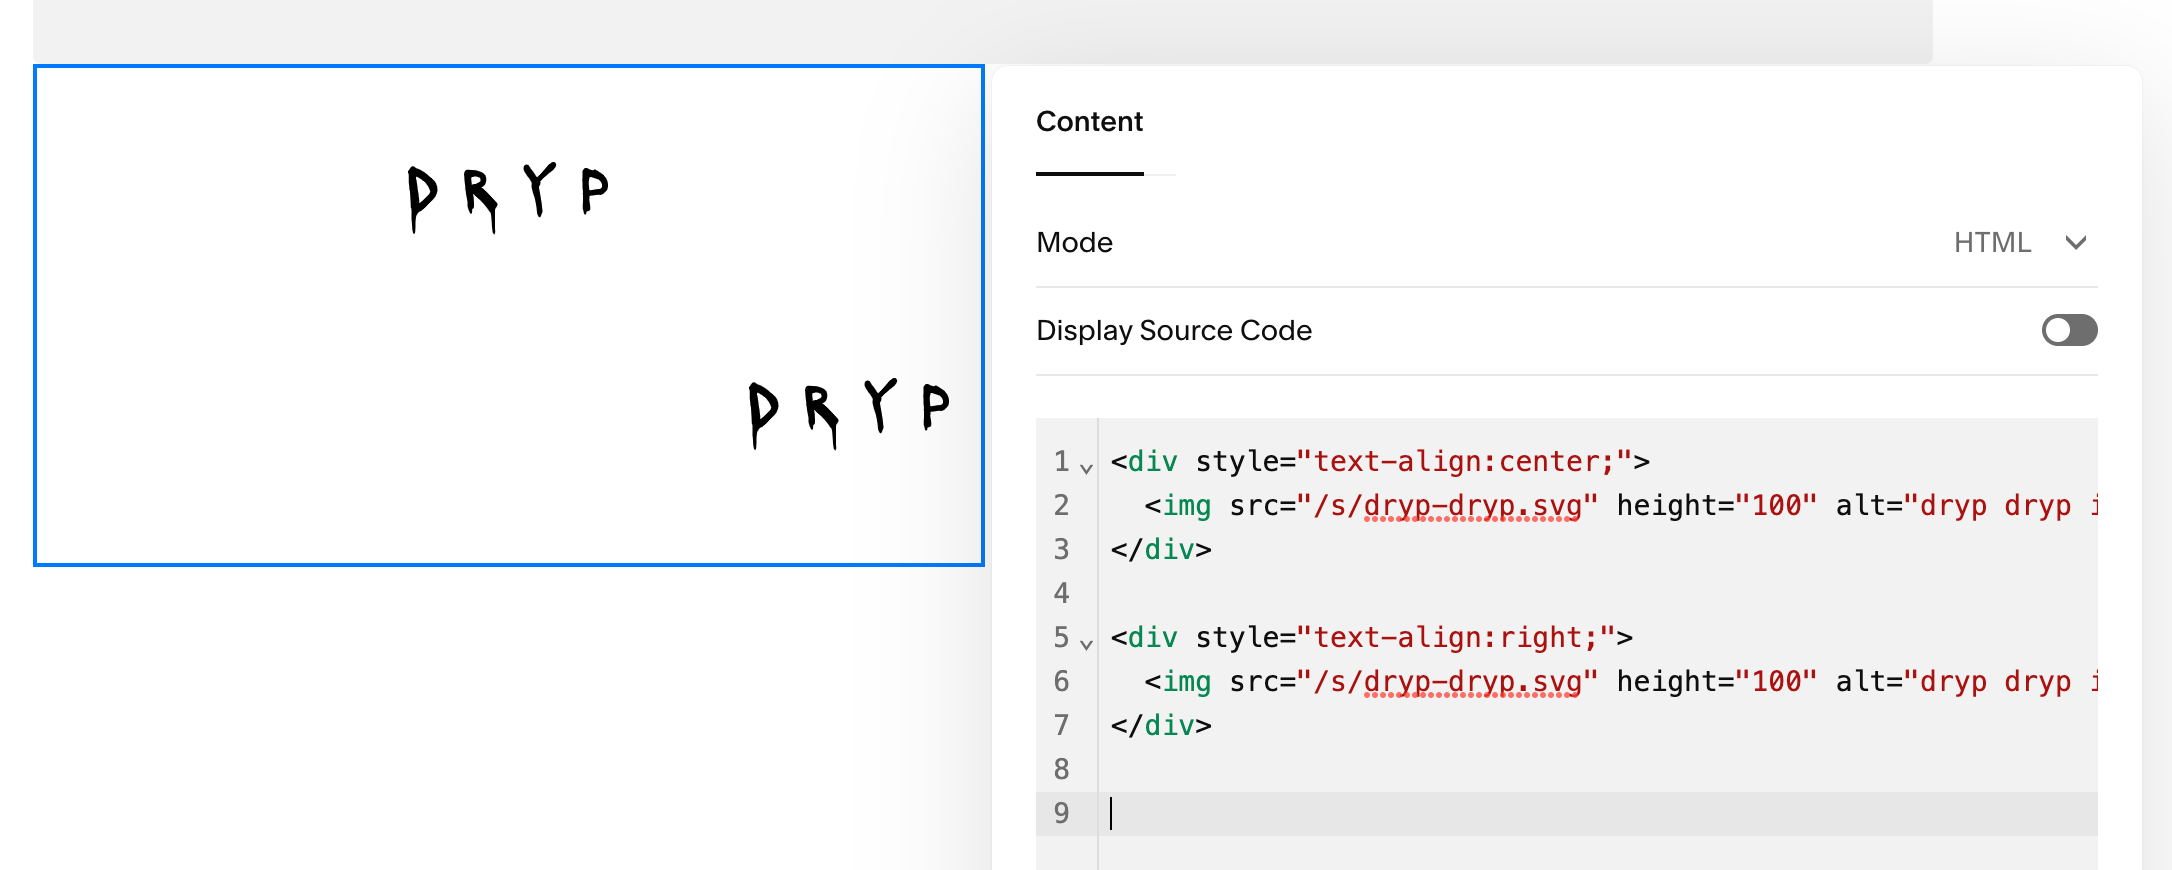
In the block editor, add a “Code” block
Copy + Paste the code below
<img src="/s/dryp-dryp.svg" height="100" alt="dryp dryp icon"></img>Replace: [ /s/dryp-dryp.svg ] with the SVG file link that was copied when uploaded
Replace: [ dryp dryp icon ] with text describing your icon
Adjust the height to a preferable size for desktop & mobile
Make sure to keep the quotes as they appear in the example code above
To center align the embedded icon:
<div style="text-align:center;">
<img src="/s/dryp-dryp.svg" height="100" alt="dryp dryp icon"></img>
</div>

To right align the embedded icon:
<div style="text-align:right;">
<img src="/s/dryp-dryp.svg" height="100" alt="dryp dryp icon"></img>
</div>
How to add Google Icons
Step 1 — Inject Code Into Page Header
Copy + paste to install the following code in your page header (Settings > Advanced > Code Injection)
<link href="https://fonts.googleapis.com/icon?family=Material+Icons" rel="stylesheet">Step 2 — Choose Method to Embed/Reference Icon
Choose how to use the icon on your website (there are three options to reference/embed it)
Add a Code Block and reference by name
Add a Code Block and assign it to an h4
Assign it to h5 and use a Markdown Block to reference the icon
Utilizing custom CSS allows us to change the size, color, and any other text property
Add A Code Block
To use an icon in a code block when editing pages, you will need to copy the code below and reference the icon name (Google Icons)
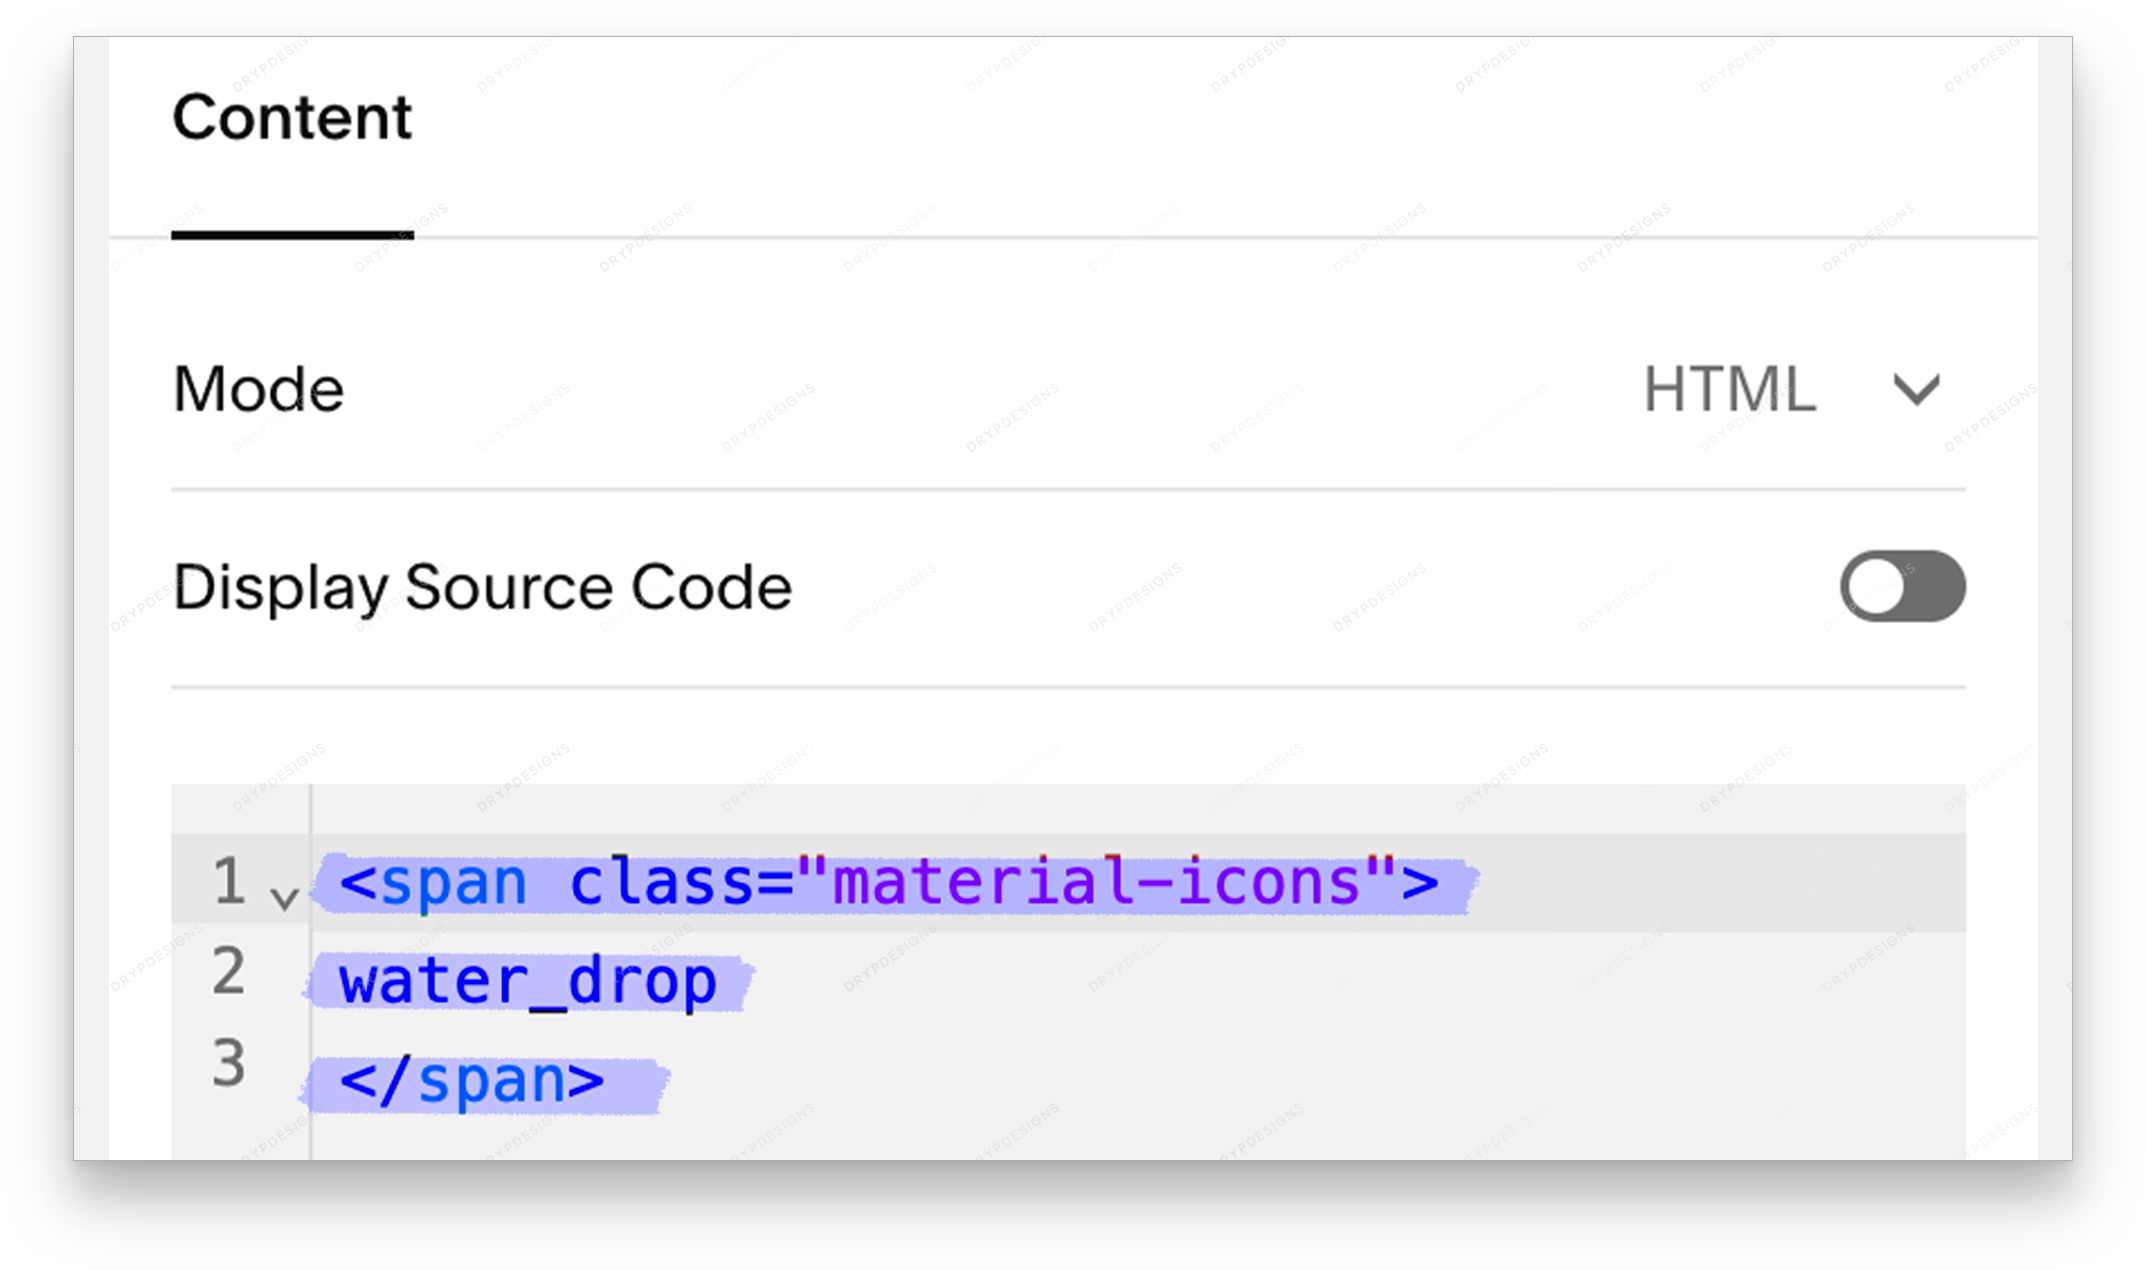
Place the name of the icon inside the class like this example for the water_drop:
“ <span class="material-icons">
water_drop
</span> “
Assign to a heading using markdown blocks
Create and assign a Font Family (h5) Using a Markdown Block — You can assign the icon font family to a specific text type / font family. (Ex. we are using h5) Make sure you assign the font family to Material Icons by adding the code below to your site’s custom CSS), and adjust the other properties and values in bold. (view below)
Step 1 — Inject the code below into your site’s custom CSS to assign to h5
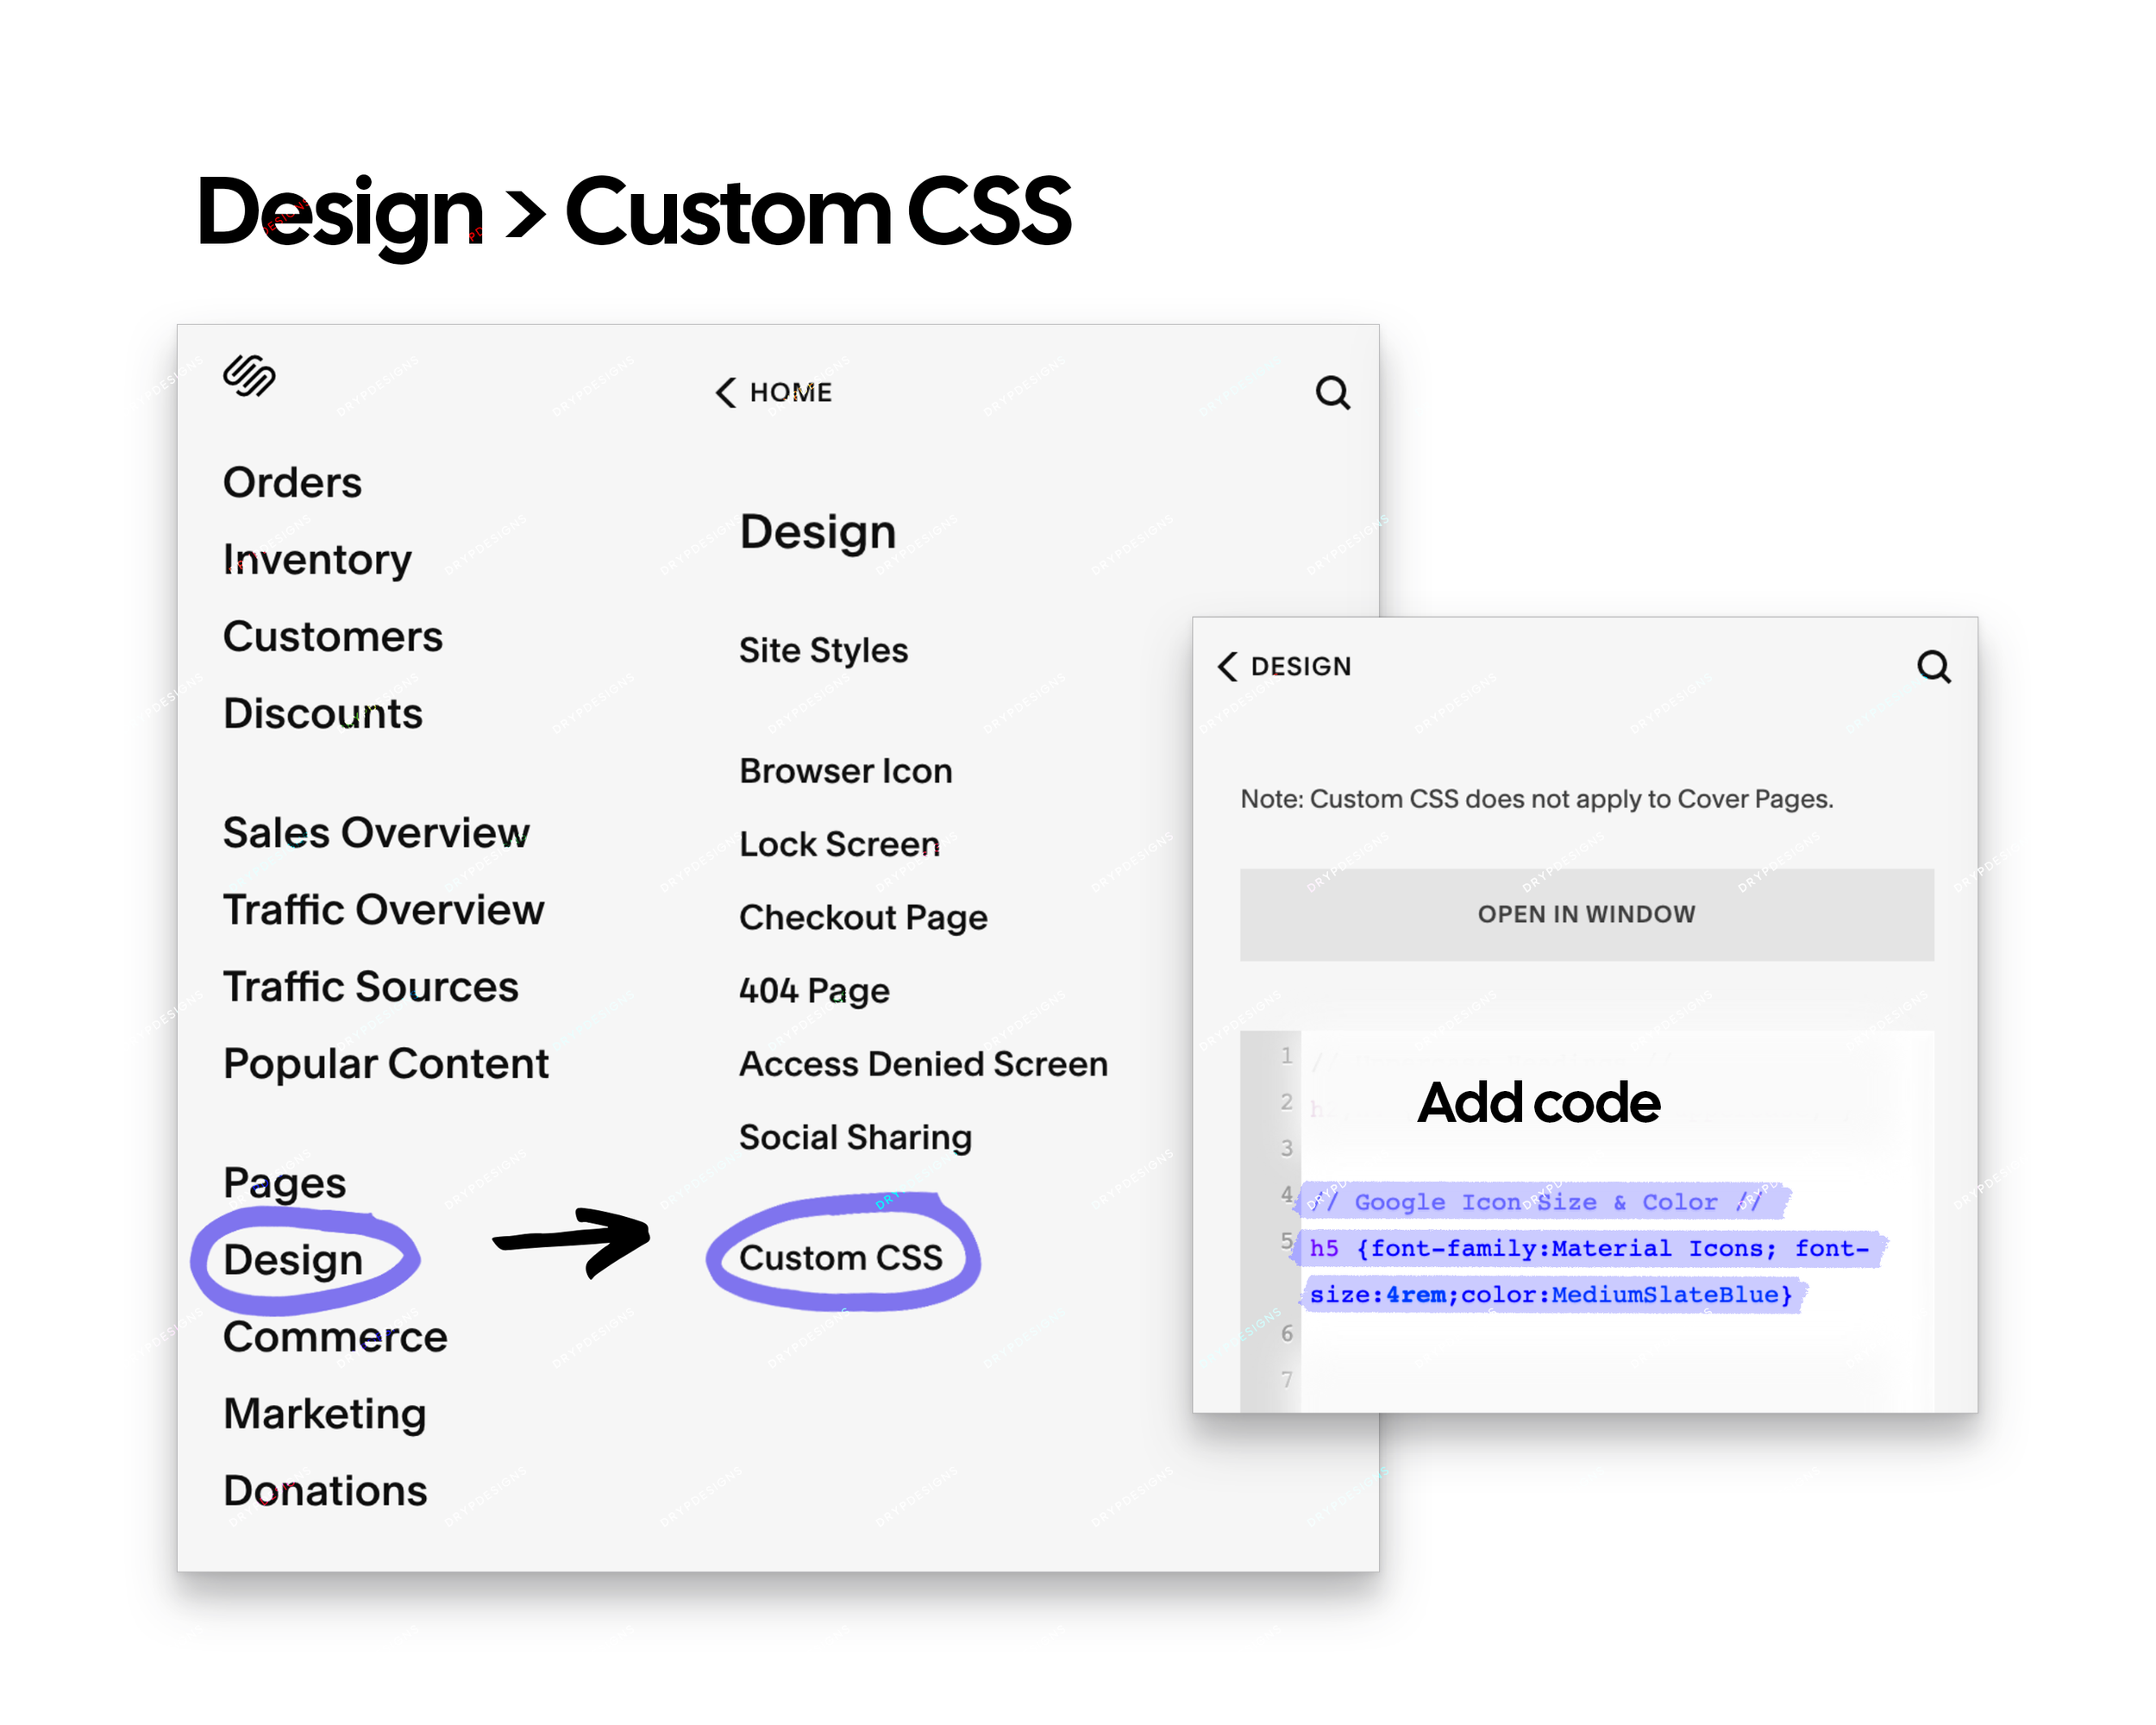
Navigate to the Custom CSS settings
Settings > Design > Custom CSS
or by URL “ https://your-website.squarespace.com/config/design/custom-css “ (make sure to replace the “your-website” in the link below with the name of url)
Copy + Paste this Code to Custom CSS
“ h5 {font-family:Material Icons} “
Customize the Icons — Adjust size and color by adding the section in bold
“ h5 {font-family:Material Icons; font-size: 4rem; color: blue} “
View list of CSS Color Names here // View list of hex codes here
Step 2 — Reference Font Family by adding a Markdown Block
When in page editing mode, add a markdown block and type “ ##### (name of icon to reference) “
##### water_drop
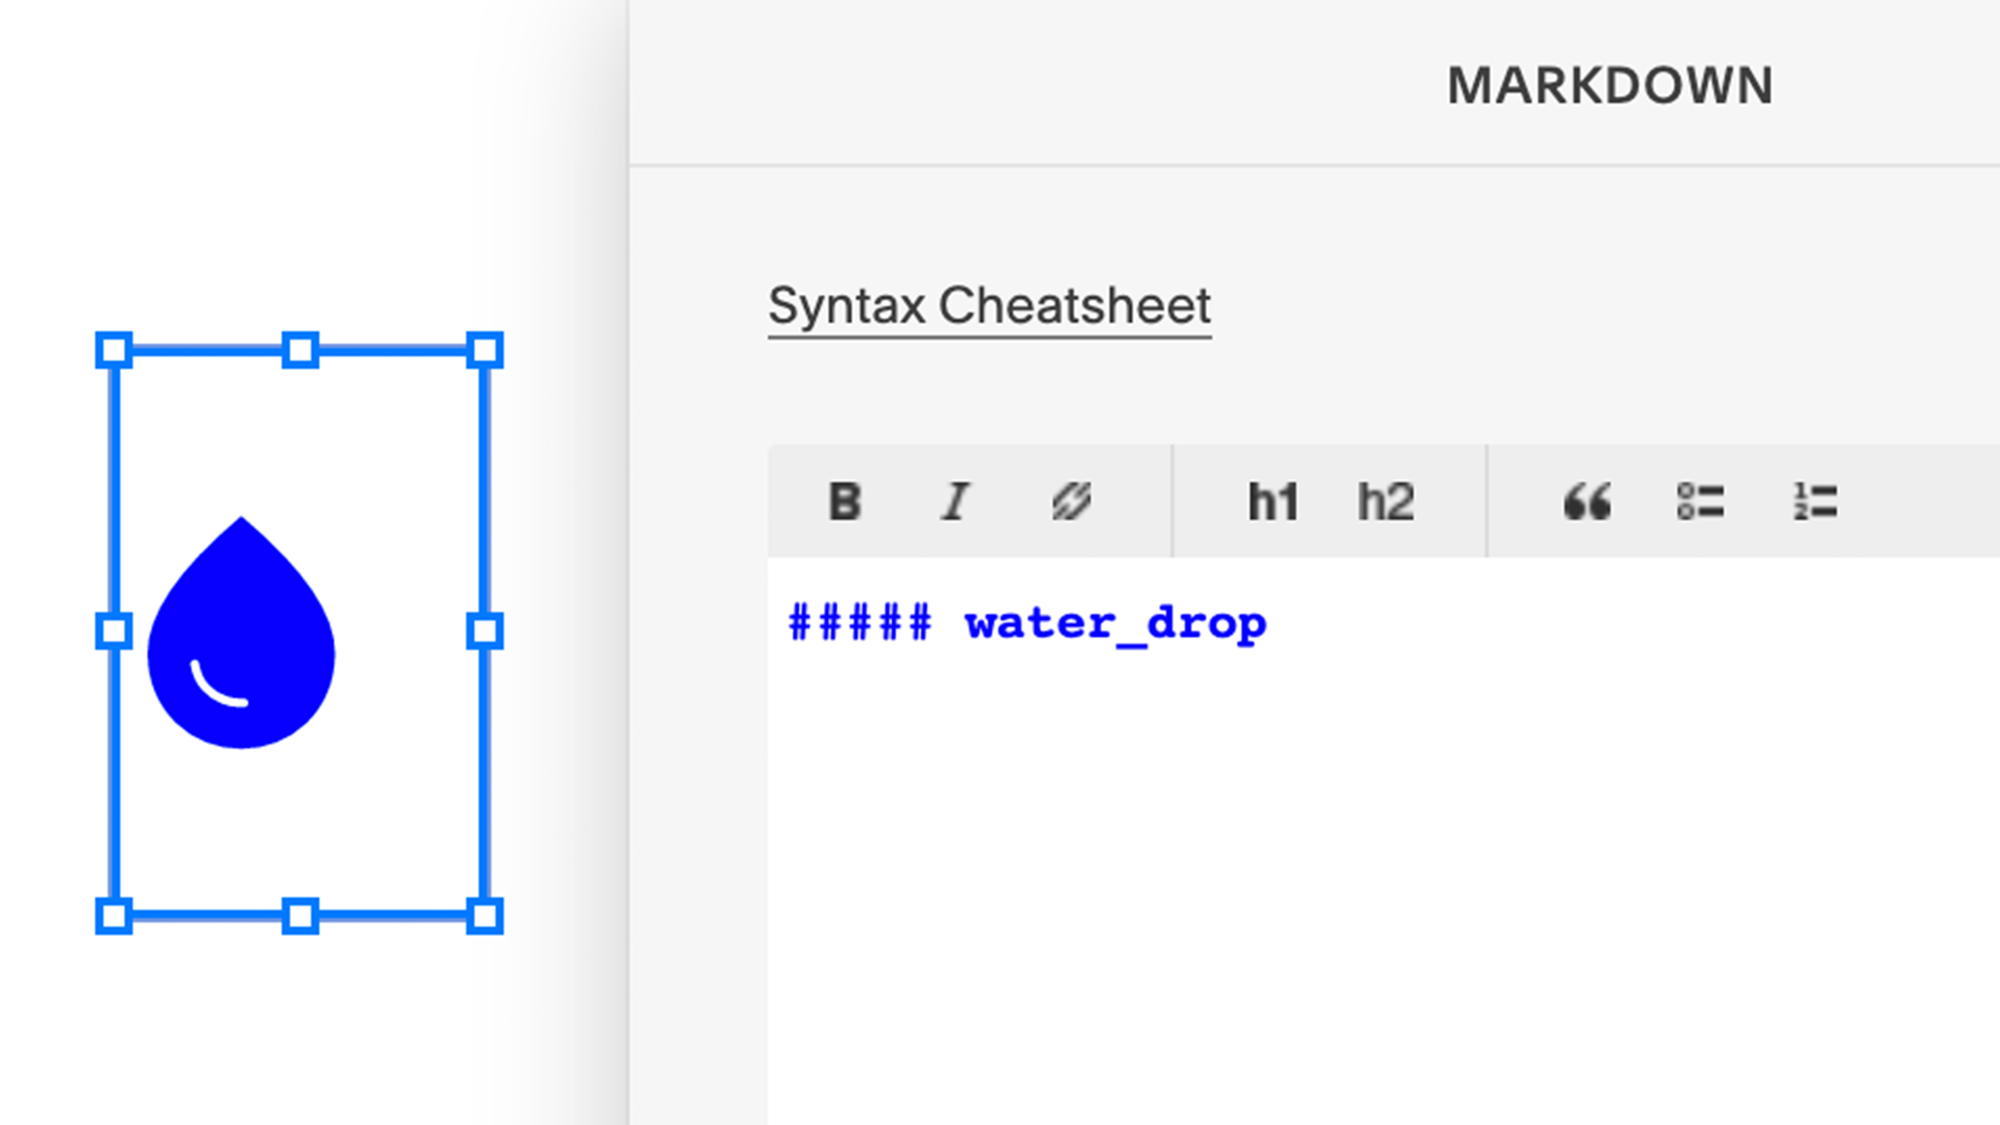
Markdown > ##### (name of icon)
the five pound “#” symbols is code for H5
Assign to an Existing Font Family
Repeat the same steps as we did above but use h4 instead of h5.
Add the following code to the Custom CSS
“ h4 {font-family: Material-Icons} “
Adjust size and color by adding the section in bold
“ h4 {font-family:Material Icons; font-size: 4rem; color: blue} “